Camp Fire Candy: Sweet Delights by the Fire

Camp Fire candy, a delightful tradition cherished by campers of all ages, adds an extra layer of magic to outdoor adventures. As the flames dance and the embers glow, there’s something truly enchanting about creating delectable treats right at the campsite. In this article, we’ll dive into the world of campfire candy, exploring ten delicious recipes that will elevate your camping experience. From the simplicity of classic s’mores to the creativity of grilled peach desserts, campfire candy offers a sweet escape from the everyday hustle and bustle.
Benefits of Camp Fire Candy
Campfire candy isn’t just about satisfying your sweet tooth; it’s an experience that combines simplicity and deliciousness in a unique way. Whether you’re a seasoned camper or a first-time adventurer, crafting these treats around the campfire brings joy and connection. So, gather your marshmallows, chocolate, and other scrumptious ingredients, and let’s embark on a journey of campfire candy delights that will make your next camping trip even more unforgettable.
1. Tips for Making Camp Fire Candy Products
Creating campfire candy is a delightful experience that can elevate your camping trip. To ensure your sweet treats turn out perfectly, here are some essential tips to keep in mind:
Use a Candy Thermometer
When making camp fire candy Products, precise temperature control is key to achieving the desired texture and consistency. Invest in a good-quality candy thermometer to monitor the temperature of your sugar-based syrups accurately. This tool will help you avoid undercooking or overcooking your candy.
Choose the Right Type of Chocolate
Chocolate is a fundamental ingredient in many camp fire candy recipes Products. Opt for high-quality chocolate bars or chips that melt evenly and have a rich, smooth flavor. Dark, milk or white chocolate can be chosen based on your preferences and the recipe.
Prep Your Ingredients in Advance
Campfire cooking requires some preparation to ensure everything goes smoothly. Measure and organize all your ingredients before starting to cook. This will help you stay organized and prevent any last-minute mishaps.
Practice Safe Camp Fire Cooking
When preparing food over an open flame, safety should always come first. Use long utensils, such as skewers or tongs, to handle hot ingredients safely. Keep a bucket of water or a fire extinguisher nearby for emergencies, and teach children campfire safety rules.
Maintain a Steady Flame
For even cooking, maintain a steady flame on your campfire. Arrange the logs or coals to create a stable cooking area, and avoid large, erratic flames that can scorch your candy.
Experiment with Flavors
Camp fire candy recipes offer plenty of room for creativity. Feel free to experiment with different flavors and ingredients to personalize your treats. Add nuts, dried fruits, or spices to create unique combinations that suit your taste.
Consider Camp Fire Cooking Accessories
Invest in campfire cooking accessories like grill grates, wire mesh, or cast iron cookware designed for open-flame cooking. These tools can make the cooking process more manageable and versatile.
Rotate and Monitor
When roasting marshmallows or skewered fruits, remember to rotate them regularly for even cooking. Keep a close eye on your campfire candy to prevent burning or melting mishaps.
Be Patient
Campfire candy can take time to prepare, especially when using slower cooking methods like roasting fruit. Patience is essential, as rushing the process can result in uneven or undercooked candy.
Share the Joy
Camp fire candy isn’t just about the end product; it’s about the experience. Share the joy of making and enjoying these sweet treats with friends and family around the campfire. It’s a great opportunity to bond with others and make enduring memories.
By following these tips, you’ll be well-prepared to master the art of making camp fire candy and indulge in delicious, homemade treats during your camping adventures.
Recipe 1: Campfire Caramel Apples Product
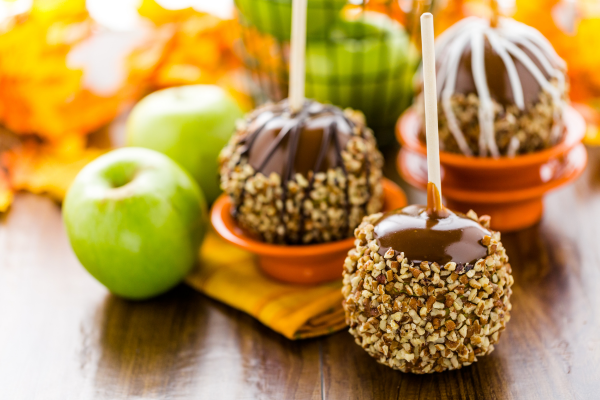
Caramel apples are a classic campfire candy that perfectly combines the sweetness of caramel with the crispness of fresh apples. Follow this simple recipe to create this delightful treat on your next camping trip.
Ingredients:
Apples (Choose your favorite variety; tart apples contrast beautifully with the sweet caramel.)
Caramel candies (You can use store-bought caramel candies for convenience.)
Wooden skewers (For inserting into the apples.)
Instructions:
1. Prepare the Apples:
Wash and thoroughly dry the apples. This will improve the caramel’s ability to stick.
The apples should be free of any stalks or leaves.
2. Insert Wooden Skewers:
Take wooden skewers and gently insert them into the tops of the apples. Make sure they are securely anchored but leave enough space for a comfortable grip.
3. Melt the Caramel:
In a heatproof saucepan or a suitable campfire-friendly container, melt the caramel candies over the campfire.
To achieve equal melting and avoid burning, stir continuously.
The caramel should be smooth and creamy when fully melted.
4. Dip the Apples:
Hold an apple by the wooden skewer and dip it into the melted caramel, swirling and turning to coat it evenly.
Allow any excess caramel to drip back into the saucepan.
5. Let Them Set:
Place the caramel-coated apples on a heatproof surface, such as a metal tray or a piece of foil.
Allow the caramel to set and cool. This may take around 15-20 minutes.
6. Enjoy Your Campfire Caramel Apples:
Once the caramel has cooled and hardened, your campfire caramel apples are ready to be enjoyed.
Bite into the crisp apple beneath the sweet caramel coating for a delightful camp fire candy treat.
Note: Be cautious when handling the hot caramel and while enjoying the apples, as the caramel can remain quite warm. Safety first!
There you have it, a simple yet satisfying camp fire candy treat that brings the flavors of fall to your camping adventures. These caramel apples are sure to be a hit around the campfire, and they’re a fun and delicious way to create lasting memories in the great outdoors.
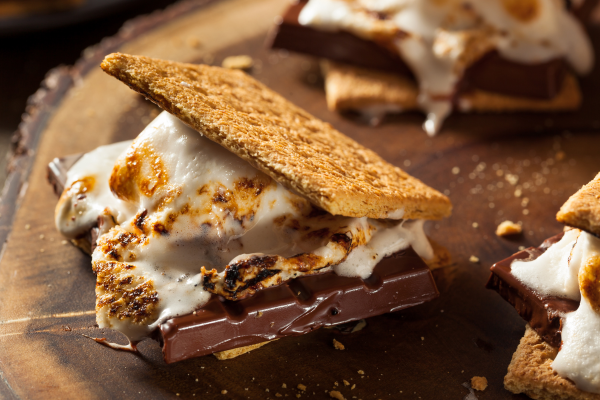
Recipe 2: Camp Fire Candy Product – S’mores Bark
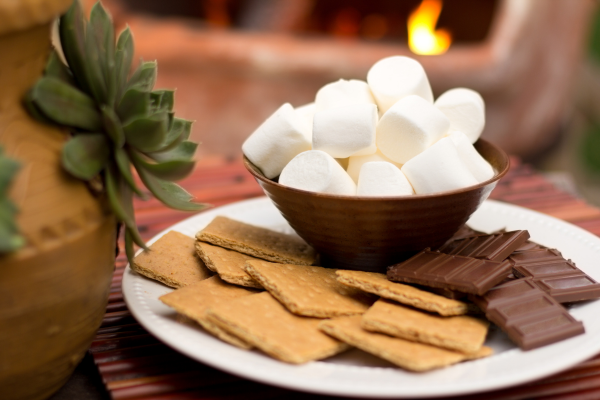
S’mores bark is the perfect campfire candy for those who love the classic combination of marshmallows, chocolate, and graham crackers but want a simpler way to enjoy it. This recipe takes the essence of s’mores and transforms it into a delightful bark that’s easy to make at your campsite.
Ingredients:
2 cups of milk chocolate chips (or your favorite chocolate variety)
1 cup of mini marshmallows
1 cup of crushed graham crackers
Cooking spray (for greasing)
Instructions:
1. Prepare the Campfire:
Ensure your campfire has a bed of hot embers, perfect for toasting marshmallows. You’ll need a campfire grate or long skewers for this step.
2. Grease a Heatproof Surface:
Find a heatproof surface at your campsite, such as a metal tray or a piece of foil, and lightly grease it with cooking spray. This will prevent the s’mores bark from sticking.
3. Melt the Chocolate:
In a heatproof container suitable for campfire use (like a metal or cast-iron pan), melt the chocolate chips over the campfire. Stir constantly to ensure smooth melting.
4. Spread the Melted Chocolate:
Once the chocolate is fully melted, pour it onto the greased heatproof surface.
Use a spatula or the back of a spoon to spread it evenly into a rectangle or desired shape. Aim for a thickness of no more than 1/4 inch.
5. Add the Toppings:
While the chocolate is still warm, sprinkle the mini marshmallows and crushed graham crackers evenly over the melted chocolate. Press them gently into the chocolate to help them adhere.
6. Let It Set:
Allow the s’mores bark to cool and set. You can place it in a shaded area or a cooler spot to speed up the process.
7. Break and Enjoy:
Once the bark has fully set and hardened, break it into smaller pieces by hand or using a knife.
Enjoy your campfire s’mores bark with family and friends by the fire, savoring the flavors of a classic campfire treat in a convenient form.
8. Store Any Leftovers:
If you somehow manage to have leftovers (it’s so delicious, it’s hard to resist), you can store them in an airtight container to enjoy later in your camping trip.
S’mores bark is a fantastic way to capture the essence of campfire s’mores without the need for individual assembly. It’s a crowd-pleaser that’s easy to make and even easier to enjoy around the campfire. So, get ready to satisfy your sweet tooth with this simple yet scrumptious camp fire candy recipe!
Recipe 3: Campfire Candy Product – Campfire Fudge
Campfire fudge is a rich and indulgent treat that’s perfect for satisfying your sweet cravings around the campfire. With just a few ingredients and a little patience, you can create this creamy and delicious campfire candy.
Ingredients:
2 cups of semi-sweet chocolate chips (or your preferred chocolate variety)
one 14-ounce can of sweetened condensed milk.
1 teaspoon of pure vanilla extract
A pinch of salt
1 cup of mini marshmallows
Optional toppings: crushed graham crackers, chopped nuts, or additional marshmallows for garnish
Instructions:
1. Prepare the Campfire:
Start by getting your campfire going and creating a bed of hot embers. You’ll need a campfire grate or a sturdy cooking surface.
2. Grease a Heatproof Container:
Choose a heatproof container that can withstand the campfire’s heat, such as a cast-iron skillet or a metal baking pan. To avoid sticking, lightly grease it with cooking spray or butter.
3. Melt the Chocolate:
In the heatproof container, combine the chocolate chips, sweetened condensed milk, vanilla extract, and a pinch of salt.
Place the container on the campfire grate, directly over the hot embers. Stir the mixture continuously as it melts. This should take about 5-10 minutes.
4. Add the Marshmallows:
Once the chocolate mixture is smooth and well combined, remove it from the campfire grate.
Gently fold in the mini marshmallows until they are evenly distributed throughout the mixture.
5. Transfer to the Heatproof Container:
Pour the fudge mixture into the greased heatproof container, spreading it out evenly.
6. Garnish (Optional):
If desired, you can sprinkle crushed graham crackers, chopped nuts, or additional marshmallows on top of the fudge for added flavor and texture.
7. Let It Set:
Allow the campfire fudge to cool and set. You can place it in a cooler area or a shaded spot to speed up the process. As it cools, it will solidify.
8. Cut and Enjoy:
Once the fudge has fully set and hardened, cut it into squares or your desired shapes.
Share the delicious campfire fudge with your camping companions and savor the creamy, chocolatey goodness by the fire.
9. Store Any Leftovers:
If you happen to have any fudge left (which is rare because it’s so irresistible), store it in an airtight container to enjoy throughout your camping trip.
Campfire fudge is a delightful campfire candy that combines the richness of chocolate with the gooey goodness of marshmallows. It’s a simple and decadent treat that adds a touch of luxury to your camping experience. So, gather around the fire and indulge in this creamy campfire delight!
Recipe 4: Campfire Candy Product – Peanut Butter Cup S’mores
If you’re a fan of the classic s’mores but want to take it up a notch, peanut butter cup s’mores are the perfect indulgence. The combination of gooey marshmallow, melty chocolate, and creamy peanut butter is simply irresistible. Get ready to elevate your camp fire candy game with this easy and delicious recipe.
Ingredients:
Large marshmallows
Reese’s Peanut Butter Cups, among other brands of peanut butter cups
Graham crackers
Wooden skewers or long campfire forks
Instructions:
1. Prepare the Campfire:
Begin by setting up your campfire and ensuring you have a bed of hot embers, suitable for toasting marshmallows. You’ll need campfire skewers or forks for roasting.
2. Assemble Your Ingredients:
Take your graham crackers and break them in half to create squares.
Unwrap the peanut butter cups and have them ready for assembly.
Thread the marshmallows onto wooden skewers or campfire forks.
3. Toast the Marshmallows:
Hold the marshmallows over the campfire, ensuring they are evenly roasted to your desired level of golden brown. This can be a matter of personal preference, but the gooier, the better for s’mores.
4. Assemble the S’mores:
Place one roasted marshmallow on a graham cracker square.
Quickly press a peanut butter cup onto the hot marshmallow, allowing the heat to soften the chocolate and peanut butter.
To make a sandwich, place another graham cracker square on top. To avoid sticking, lightly grease it with cooking spray or butter.
5. Let Them Melt:
Allow the warmth from the marshmallow to melt the peanut butter cup slightly, creating a creamy and decadent filling.
6. Enjoy Your Peanut Butter Cup S’mores:
Take a bite and savor the delicious combination of marshmallow, chocolate, and peanut butter. The campfire heat will have transformed this into a gooey, campfire candy masterpiece.
Peanut butter cup s’mores are a mouthwatering twist on the traditional campfire treat. They offer a perfect blend of textures and flavors that will leave you craving more. Share these delightful campfire candy creations with your fellow campers and experience the joy of a campfire dessert that’s both comforting and indulgent.
Recipe 5: Campfire Candy Product – Campfire Toffee
Campfire toffee is a sweet, crunchy treat that’s perfect for satisfying your sugar cravings around the campfire. This easy recipe combines the rich flavors of buttery toffee and chocolate for a delicious campfire candy that everyone will love.
Ingredients:
1 cup (2 sticks) of unsalted butter
1 cup of granulated sugar
1/4 teaspoon of salt
1/4 cup of water
1 teaspoon of vanilla extract
1 cup of semi-sweet chocolate chips
Crushed graham crackers (optional, for topping)
Instructions:
1. Prepare the Campfire:
Start by setting up your campfire and allowing it to burn down to a bed of hot embers. You’ll need a heatproof container for cooking the toffee.
2. Grease a Heatproof Container:
Choose a heatproof container suitable for campfire use, such as a metal or cast-iron pan. To avoid sticking, lightly grease it with cooking spray or butter.
3. Combine the Ingredients:
In the heatproof container, combine the unsalted butter, granulated sugar, salt, and water. Place the container on the campfire grate, directly over the hot embers.
4. Stir Continuously:
Stir the mixture continuously as it heats and the ingredients melt. Continue stirring until the mixture thickens and turns a deep golden brown color. This should take about 10-15 minutes.
5. Add Vanilla Extract:
Once the toffee reaches the desired color and consistency, remove it from the campfire grate.
Stir in the vanilla extract to flavor the toffee.
6. Pour the Toffee:
Pour the hot toffee into a heatproof container lined with parchment paper or greased foil. Spread it out evenly.
7. Add Chocolate Topping:
While the toffee is still hot, sprinkle the semi-sweet chocolate chips evenly over the top.
Let the toffee’s heat melt the chocolate chunks. After a few minutes, use a spatula to spread the melted chocolate evenly over the toffee.
8. Optional Topping:
If you desire an extra touch, sprinkle crushed graham crackers over the melted chocolate for added flavor and texture.
9. Let It Cool:
Allow the campfire toffee to cool and harden. This may take about 30 minutes to an hour, depending on the temperature.
10. Break and Enjoy:
Once the toffee has fully set and hardened, break it into bite-sized pieces by hand or using a knife.
Savor the sweet and crunchy campfire toffee by the fire with friends and family.
11. Store Any Leftovers:
If you manage to have any toffee left (it’s so tempting), store it in an airtight container to enjoy later during your camping trip.
Campfire toffee is a delightful campfire candy that combines the richness of buttery toffee with the sweetness of chocolate. It’s a simple yet indulgent treat that adds a touch of luxury to your camping experience. Share the joy of this homemade campfire candy with your fellow campers and create sweet memories by the fire.
Recipe 6: Campfire Candy Product – Chocolate-Covered Pretzel Rods

Chocolate-covered pretzel rods are a delightful campfire candy that balances the salty crunch of pretzels with the sweetness of chocolate. They’re a simple yet irresistible treat that’s easy to make during your camping adventure.
Ingredients:
Pretzel rods (as many as you’d like to prepare)
Chocolate chips (dark, milk, or white chocolate, depending on your preference)
Toppings of your choice (e.g., crushed nuts, sprinkles, crushed cookies, or sea salt)
Instructions:
1. Prepare the Campfire:
Begin by setting up your campfire and allowing it to burn down to a bed of hot embers. You’ll need a heatproof container for melting the chocolate.
2. Melt the Chocolate:
In a heatproof container suitable for campfire use (like a metal or cast-iron pan), melt the chocolate chips over the campfire. Stir continuously to ensure even melting.
3. Dip the Pretzel Rods:
Hold a pretzel rod by one end and dip it into the melted chocolate, ensuring it’s fully coated. Use a spoon to help cover the pretzel evenly.
Reintroduce any extra chocolate into the container by letting it drip.
4. Add Toppings (Optional):
If you’d like to add toppings to your chocolate-covered pretzel rods, do so immediately after dipping while the chocolate is still wet. Sprinkle crushed nuts, sprinkles, crushed cookies, or a pinch of sea salt onto the chocolate.
5. Let Them Set:
Place the chocolate-covered pretzel rods on a heatproof surface, such as a metal tray or a piece of foil.
Allow the chocolate to cool and set. This should take about 15-20 minutes, depending on the temperature.
6. Enjoy Your Chocolate-Covered Pretzel Rods:
Once the chocolate has fully set and hardened, your campfire candy is ready to be enjoyed.
Share these sweet and salty delights with your camping companions around the campfire.
7. Store Any Leftovers:
If you somehow have any chocolate-covered pretzel rods left (they’re quite addictive), store them in an airtight container to enjoy later during your camping trip.
Chocolate-covered pretzel rods are a fantastic campfire candy that combines the savory crunch of pretzels with the smooth sweetness of chocolate. They’re incredibly easy to make and even easier to savor by the campfire. Share these delightful treats with your fellow campers and revel in the joy of a simple and satisfying camping dessert.
Also Read: 25 Exciting Expert Travel Tips and Tricks for 2023
Recipe 7: Campfire Candy Product – Campfire Cinnamon Sugar Popcorn
Campfire cinnamon sugar popcorn is a sweet and crunchy campfire candy that’s perfect for snacking by the fire. It combines the comforting flavors of cinnamon and sugar with the satisfying crunch of popcorn. Get ready to enjoy this simple yet delightful treat during your camping adventure.
Ingredients:
Popcorn kernels (unpopped)
Cooking oil (for popping the popcorn)
1/4 cup of granulated sugar
1 teaspoon of ground cinnamon
A pinch of salt
Instructions:
1. Prepare the Campfire:
Begin by setting up your campfire and allowing it to burn down to a bed of hot embers. You’ll need a heatproof container for popping the popcorn.
2. Pop the Popcorn:
In a heatproof container suitable for campfire use, add the unpopped popcorn kernels. Over the kernels, drizzle a small amount of frying oil.
Cover the container with a lid or foil, leaving a small vent for steam to escape.
Place the container on the campfire grate, directly over the hot embers.
Shake the container occasionally to ensure even popping. Pop the popcorn until the popping sounds slow down, indicating that most of the kernels have popped.
3. Mix Cinnamon Sugar:
While the popcorn is popping, mix the granulated sugar, ground cinnamon, and a pinch of salt in a separate bowl. Your cinnamon sugar mixture will be this.
4. Coat the Popcorn:
Once the popcorn is popped, carefully remove it from the campfire grate.
While it’s still warm, drizzle the cinnamon sugar mixture over the popcorn. Use a large spoon or spatula to gently toss and coat the popcorn evenly.
5. Let It Cool:
Allow the campfire cinnamon sugar popcorn to cool and the sugar to set. This should take about 10-15 minutes, depending on the temperature.
6. Enjoy Your Campfire Cinnamon Sugar Popcorn:
Once the cinnamon sugar coating has fully set and hardened, your campfire candy is ready to be enjoyed.
Share this sweet and crunchy treat with your camping companions and savor the comforting flavors of cinnamon and sugar by the fire.
7. Store Any Leftovers:
If, by some miracle, you have any campfire cinnamon sugar popcorn left (it’s a favorite!), store it in an airtight container to enjoy later during your camping trip.
Campfire cinnamon sugar popcorn is a delightful campfire candy that combines the warmth of cinnamon and sugar with the satisfying crunch of popcorn. It’s a quick and easy treat to prepare while camping and adds a touch of sweetness to your outdoor adventures. Share the joy of this simple yet delicious camping snack with your fellow campers and relish the comforting flavors by the campfire.
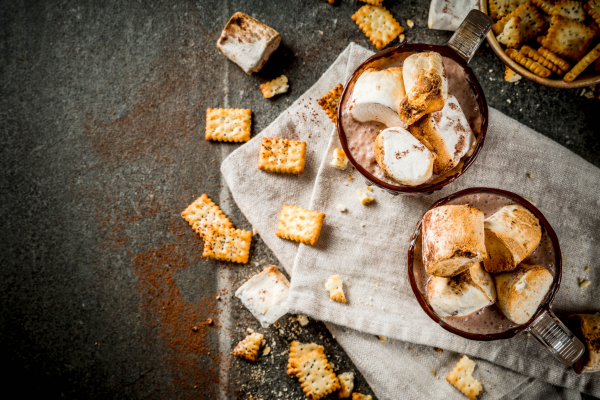
Recipe 8: Campfire Candy Product – Campfire S’mores Dip
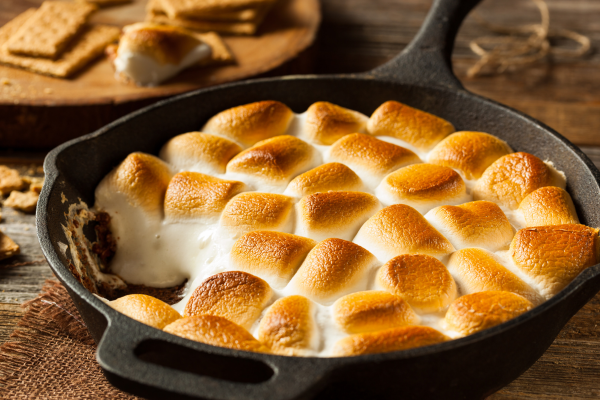
Campfire s’mores dip is a delightful twist on the classic s’mores experience. It’s gooey, chocolaty, and perfect for sharing around the campfire. This recipe transforms the traditional s’mores into a dip that’s easy to make and enjoy.
Ingredients:
1 cup of semi-sweet chocolate chips
1 cup of mini marshmallows
Graham crackers (for dipping)
Instructions:
1. Prepare the Campfire:
Begin by setting up your campfire and ensuring you have a bed of hot embers, suitable for melting chocolate. You’ll need a heatproof container for this recipe.
2. Assemble Your Ingredients:
Place the semi-sweet chocolate chips and mini marshmallows in separate containers and have them ready for assembly.
Break the graham crackers into pieces suitable for dipping.
3. Layer the Chocolate Chips:
In a heatproof container suitable for campfire use, start by layering the semi-sweet chocolate chips evenly on the bottom. You can use a small cast-iron skillet, a heatproof dish, or a foil packet.
4. Add the Marshmallows:
Next, top the chocolate chips with the mini marshmallows, ensuring they cover the chocolate layer completely.
5. Heat and Melt:
Place the container with the chocolate chips and marshmallows on the campfire grate, directly over the hot embers.
Allow the chocolate chips and marshmallows to melt. This should take about 5-10 minutes. Keep a close eye on it, as marshmallows can quickly brown and become gooey.
6. Dip and Enjoy:
Once the chocolate chips are fully melted, carefully remove the container from the campfire.
Use graham crackers to scoop up the melted chocolate and marshmallows.
Share the delicious campfire s’mores dip with your fellow campers and savor the gooey, chocolaty goodness.
Campfire s’mores dip offers all the flavors of traditional s’mores in a convenient and shareable form. It’s a fantastic way to enjoy the classic camping treat without the need for individual assembly. Gather around the fire, dip your graham crackers, and create lasting memories with friends and family by the campfire.
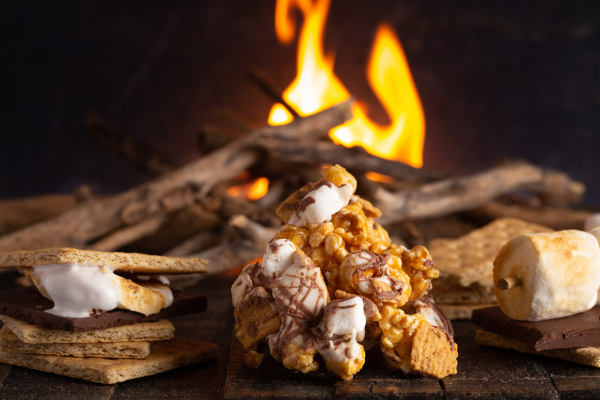
Recipe 9: Campfire Candy Product – Campfire Caramel Corn

Campfire caramel corn is a sweet and crunchy campfire candy that’s perfect for satisfying your sugar cravings around the campfire. This recipe combines the rich flavors of caramel with the crispness of popcorn, creating a delightful treat that’s easy to make during your camping adventure.
Ingredients:
Popcorn kernels (unpopped)
Cooking oil (for popping the popcorn)
1 cup of granulated sugar
1/2 cup of unsalted butter
1/4 cup of light corn syrup
1/4 teaspoon of salt
1/4 teaspoon of baking soda
1/2 teaspoon of pure vanilla extract
Instructions:
1. Prepare the Campfire:
Begin by setting up your campfire and allowing it to burn down to a bed of hot embers. You’ll need a heatproof container for making the caramel.
2. Pop the Popcorn:
In a heatproof container suitable for campfire use, add the unpopped popcorn kernels. Over the kernels, drizzle a small amount of frying oil.
Cover the container with a lid or foil, leaving a small vent for steam to escape.
Place the container on the campfire grate, directly over the hot embers.
Shake the container occasionally to ensure even popping. Pop the popcorn until the popping sounds slow down, indicating that most of the kernels have popped.
3. Make the Caramel Sauce:
In a separate heatproof container, combine the granulated sugar, unsalted butter, light corn syrup, and salt.
Place the container on the campfire grate, directly over the hot embers. Stir continuously as the ingredients melt and the mixture comes to a boil.
4. Add Baking Soda and Vanilla Extract:
Once the caramel mixture reaches a boil, carefully remove it from the campfire grate.
Add the baking soda and pure vanilla extract after stirring. Be prepared for the mixture to bubble up when you add the baking soda.
5. Coat the Popcorn:
Place the popped popcorn in a large heatproof container or a disposable aluminum roasting pan.
Pour the hot caramel sauce over the popcorn. Use a large spoon or spatula to gently toss and coat the popcorn evenly with the caramel.
6. Let It Cool:
Allow the campfire caramel corn to cool and the caramel to set. This should take about 30 minutes to an hour, depending on the temperature.
7. Enjoy Your Campfire Caramel Corn:
Once the caramel has fully set and hardened, your campfire candy is ready to be enjoyed.
Share this sweet and crunchy treat with your camping companions and savor the rich, buttery caramel flavor by the fire.
8. Store Any Leftovers:
If you somehow have any campfire caramel corn left (it’s a favorite!), store it in an airtight container to enjoy later during your camping trip.
Campfire caramel corn is a delightful campfire candy that combines the richness of caramel with the crispness of popcorn. It’s a satisfying and addictive treat that adds a touch of sweetness to your outdoor adventures. Share the joy of this homemade campfire candy with your fellow campers and create sweet memories by the campfire.
Recipe 10: Campfire Candy Product – Campfire Rice Krispie Treats
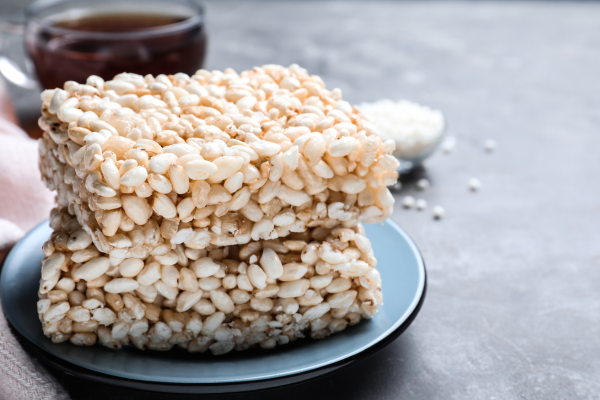
Campfire Rice Krispie treats are a gooey and nostalgic campfire candy that’s loved by campers of all ages. This classic recipe combines the simplicity of Rice Krispies cereal with the sweetness of marshmallows to create a delightful treat that’s perfect for sharing around the campfire.
Ingredients:
6 cups of Rice Krispies cereal (or a similar crisped rice cereal)
1/4 cup of unsalted butter
1 package (10 ounces) of marshmallows
Cooking spray (for greasing)
Instructions:
1. Prepare the Campfire:
Begin by setting up your campfire and ensuring you have a bed of hot embers, suitable for melting marshmallows. You’ll need a heatproof container for this recipe.
2. Grease a Heatproof Container:
Choose a heatproof container suitable for campfire use, such as a metal or cast-iron pan. Grease it lightly with cooking spray to prevent sticking.
3. Melt the Butter:
In the heatproof container, melt the unsalted butter over the campfire grate. Stir continuously to ensure even melting.
4. Add the Marshmallows:
Once the butter is fully melted, add the marshmallows to the container.
Stir continuously as the marshmallows melt and the mixture becomes smooth and gooey. This should take about 5-7 minutes.
5. Combine with Rice Krispies:
Remove the container from the campfire grate.
Quickly add the Rice Krispies cereal to the melted marshmallow mixture.
Use a spatula or a wooden spoon to gently fold the cereal into the marshmallow mixture until it’s evenly coated.
6. Transfer to the Heatproof Container:
Pour the mixture into a greased heatproof container. It can be uniformly pressed down using a spatula or the back of a spoon.
7. Let It Cool:
Allow the campfire Rice Krispie treats to cool and set. This should take about 15-20 minutes, depending on the temperature.
8. Cut and Enjoy:
Once the treats have fully set and hardened, cut them into squares or your desired shapes.
Share the gooey and nostalgic campfire Rice Krispie treats with your fellow campers and savor the classic flavors by the fire.
9. Store Any Leftovers:
If you somehow have any Rice Krispie treats left (they tend to disappear quickly), store them in an airtight container to enjoy later during your camping trip.
Campfire Rice Krispie treats are timeless camp fire candy that brings back childhood memories of gooey marshmallow goodness. They’re incredibly easy to make and even easier to enjoy by the campfire. Share these delightful treats with your camping companions and relish the simple joy of a classic camping dessert.
Conclusion:
In the heart of the great outdoors, by the crackling campfire, there’s nothing quite like the joy of indulging in camp fire candy. From the gooey sweetness of campfire s’mores dip to the crunchy delight of campfire caramel corn, these treats add a touch of magic to your camping adventures.
We’ve explored ten delectable camp fire candy recipes that are not only delicious but also easy to prepare right at your campsite. Whether you’re roasting marshmallows for s’mores or whipping up a batch of campfire Rice Krispie treats, the simplicity and satisfaction of camp fire candy are undeniable.
So, why not make your next camping trip extra special? Gather around the campfire with friends and family, and try your hand at creating these delightful camp fire candy recipes. The memories you’ll create and the smiles you’ll share are worth every delicious bite.
From the crackling flames to the sweet aromas, the great outdoors becomes even greater when you add a dash of campfire candy to the mix. So, don’t wait—start planning your campfire candy adventure and savor the flavors of the wilderness like never before. Your next camping trip is sure to be a sweet success!